So, you’ve done the research, read the reviews, and finally purchased your gun cleaning kit. You’ve got your kit, your solvent, your oil, and a dirty gun sitting in front of you. Now what? Thankfully, all of the hard work has already been done! Using a gun cleaning kit properly is a very simple task, but there are a few tips and tricks that will make your life easier. You will need to be careful though, as improper use of your cleaning kit does have the potential to damage your firearm. If you want to learn how to clean your firearm safely, then keep reading!
Related Articles:
- Learn Here: Gun Lubrication 101 [Know Your Stuff]
- Gunk? How to Remove Rust From a Gun [Clean]
- Easy! How to Store Guns to Prevent Rust [Eliminate Moisture]
- Don’t Overdo It! Can Guns be Over Cleaned? [Right Tools]
- Question: How Often Should You Clean Your Guns? [Like New]

Related Buyers Guides:
Safety First!
Before you even think about cleaning your firearm, the first and very most important thing to do is make sure that it is unloaded. There are many accidents that occur during cleaning due to people who didn’t check to make sure their gun was unloaded. This situation gets especially complicated with many semi-automatic handguns, some of which actually require you to drop the firing pin in order to remove the slide (such as Glocks). Due to this, it is of the utmost importance to both visually and physically inspect the chamber and magazine. You will also want to make sure that there is no live ammunition anywhere near you when you are cleaning your firearm.
Just because you are cleaning your gun, doesn’t mean that you don’t have to follow the basic rules of gun safety. You will also want to be certain that you never point the gun at anything you are not willing to destroy throughout the entire disassembly and reassembly process. By doing this, you will ensure that even if there is a negligent discharge, the bullet will be contained properly and not cause any bodily harm.
Disassembly
 Once you have verified that your firearm is not loaded, it is time to take it apart. Disassembly is going to vary widely based on your brand and type of firearm, so it is best to consult a youtube video or your owners manual for disassembly instructions. There are 2 basic types of disassembly for gun cleaning: field stripping, and complete disassembly.
Field Stripping
Field stripping is the term for a quick and easy disassembly of your firearm, and can almost always be done with either no or minimal tools. This usually separates the action from the receiver and removes the bolt or slide from the firearm. This usually exposes the fire control group, but leaves it intact and installed in the firearm. This allows you easy access to all of the major components of your firearm for cleaning, and in most cases is as far as you need to go.
Complete Disassembly
Every now and then, it is a good idea to completely disassemble your firearm for a total clean. I usually like to do this about once a year, mainly before each season for my hunting firearms. A complete disassembly will remove every individual part of your firearm, and usually requires an assortment of punches and screwdrivers. A complete disassembly is only recommended if you are very familiar with your firearm, and know that you will be able to get it back together. Otherwise, this type of cleaning is best performed by a gunsmith.
Start Cleaning- Solvent
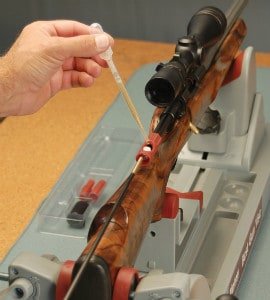
Once you have your firearm stripped down and ready for cleaning, the first step is to apply solvent. This will help dissolve stubborn gunk and fouling that would otherwise be very hard to remove. How you apply this will depend on the kind of solvent you purchased. My favorite type of solvent is Hoppe’s Elite. It is a bit expensive, but it comes in an easy to use spray bottle that allows you to spray it liberally down the bore and in the receiver and bolt, or anywhere else where fouling might accumulate. You may also need to spray some on a patch to run through the bore.
 Break That Fouling Free-Brush It!
Once you’ve applied a generous helping of your favorite solvent, it is necessary to help it along a bit with a brush. This is where your fancy new gun cleaning kit comes into play. You see all of those nice, shiny bronze brushes neatly organized in your brand new kit? You will need to select the one that most closely matches your bore size (most brushes will be stamped with the size up near the threads) and put it on your assembled cleaning rod, and run it through the bore.
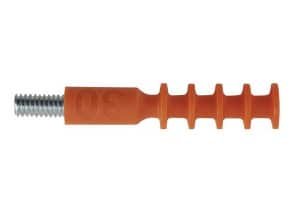
This step is one of the more tricky parts of gun cleaning and is also where you can harm your firearm if you’re not careful. If you are using a metal multi-piece cleaning rod to clean your bore, you will need to be very careful not to rub the rod on the inside of the barrel or crown. The “lips” where the cleaning rod sections together can easily catch and damage your barrel. Because of this, I always opt to use a single piece carbon fiber cleaning rod or a plastic coated steel pull cable. If you do decide to use the cleaning rod that came with your kit, it is a good idea to use a bore guide to help prevent any damage to your barrel.
There are several schools of thought on this, but it is generally considered best to clean your bore from breech to muzzle. This is the same direction that the bullet travels, and it helps to pull all of the fouling and crud out the end of the muzzle instead of depositing it in the chamber. Since the chamber is always a slightly larger diameter than the bore, running the brush from the muzzle to the breech with just push all of the dissolved fouling into the chamber.
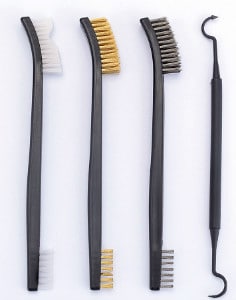
After you have given the bore a good scrub, it’s time to move on to the receiver, bolt, slide, or any other area of the firearm that you sprayed your solvent. This is where your utility brushes really come in handy. Hopefully, you bought a cleaning kit with a good assortment of brushes, but if you didn’t, you can also purchase them separately. This 6-piece brush set also comes with a pick, which will be useful later. This step is pretty self-explanatory: simply scrub down all of your components to clean off any fouling or grime.
More Related Articles:
More Related Buyers Guides:
Clean Up All The Gunk
 After you’ve broken all of the fouling and crud free with your brushes and solvent, you will be left with what looks like a muddy, gooey mess all over the place. This is where your rags come in handy. Many companies make fancy cleaning cloths that are supposed to do special tasks, but for the most part, any old cotton cloth will do. These basic 14-inch square rags will be more than adequate to clean up your mess and are much more affordable than the special cleaning cloths. The easiest part of this is the bolt, receiver, and other large, easy to get to components of your firearm.
A slightly more difficult area to accomplish this task is the bore. For this, you will need special cleaning patches. A patch is placed over the cleaning jag, or through the slotted tip, and pushed or pulled through the barrel, from breech to muzzle, in order to soak up all the gunk that you broke free. This usually takes quite a bit of patches, and I usually end up alternating several times between patches and the bronze brush to get it totally clean. A much easier way of accomplishing this task is a revolutionary product from Remington called the bore Squeeg-E. It is made of soft silicone, and a single pass is all that’s needed to wipe all of the crud and solvent out of the end of your barrel. The one listed here is in 44/45 gauge, but they come in a variety of different sized to fit every firearm.
Protect Your Metal And Ensure Proper Function
So you’ve just finished soaking, scrubbing, and wiping, and now you are left with a shiny, clean, and dry firearm. Now what? You certainly can’t begin re-assembly without any lubrication, and all of that exposed metal will rust in no time without any sort of protection. The final step before reassembly is to completely oil and grease your firearm. The general adage here is, “if it slides, grease it, if it rotates, oil it. My favorite oil to use is the LPX gun oil from M Pro-7.
This is another area where it can be very easy to cause damage or create malfunctions with your firearm. Any part that does not get even a very light coating of oil or grease is prone to rust. Yes, this includes the bore as well. It is a good idea to soak a cleaning patch in oil and push it through the barrel to give it a light coat of rust preventing oil. Another problem many people cause themselves is over-lubrication. With today’s modern firearms technology and tight tolerances, you don’t need very much lubricant to get the job done. Over-lubrication can give fouling and carbon a place to collect and build up, which can easily cause malfunctions. As long as everything gets a very light coat of oil or grease, you should be fine.
Reassembly
 Reassembly is probably one of the most underrated steps of gun cleaning. Many people don’t consider this step when starting to clean there gun, and after everything has been cleaned and oiled, they have no idea how to get the gun back together. The best way to remedy this is to pay close attention during disassembly, and lay out all of your parts in such a way that it will be easy to remember how they go back together.
Another huge problem that can be caused during reassembly is the deformation of fasteners. It can be very easy to strip out your screws trying to get them as tight as possible, but the far more common scenario is mushrooming the heads on your pins. If you repeatedly hit the head of your pin with a hard steel hammer, it will eventually cause the head to mushroom over and expand over time. The best way to combat this is to use a soft, small, plastic or rubber hammer to drive in your pins during reassembly.
Gun Cleaning Final Thoughts
When it comes to cleaning your gun, I can’t stress safety enough. Negligent discharges during cleaning are far more common than you think, and while I have never had one happen myself, I know several people who have. If you don’t think that you are capable of cleaning your firearm safely or effectively, it is best to take it to a qualified gunsmith, or maybe even a friend that you trust. I have cleaned lots of guns for friends of mine who either didn’t know how or didn’t think that they could it safely. Cleaning your guns yourself can actually be a very fun and rewarding experience if you do it right, and as long as you follow this guide to the T, you shouldn’t have any problems. If you’re looking for more than what you see here, please review our Best Reloading Kit Buyers Guide and our Best Gun Safe Buyers Guide.
Footnotes:
Even More Related Buyers Guides:
- NRA Family: Barrel Bliss: How to Properly Clean a Gun
- OTIS Smart Gun Care: INSTRUCTION SHEETS
- Range 365: Seven Things You Need to Clean a Gun

Dan is an avid outdoorsman and shooter who developed a passion for firearms at an early age. When you can’t find him in the field chasing birds or big game, you can find him at the range shooting various competitions such as 3-gun, IPSC, and IDPA. He also enjoys manufacturing his own ammunition, as well as both working on, and building his own firearms. Dan has many years of firearms experience, and enjoys helping people find the right gear and sharing his extensive firearms knowledge.